HOW TO CONTROL YOUR JENSEN SOUND SYSTEM WITH NO MORE THAN YOUR TV REMOTE

Imagine sitting down in the lounge, excited to dig into a new flick you’ve been dying to see…
You scoop up the TV remote… point it at the telly and hit the ON button, and… the Blu-ray player spits out a disc.
“What the?!!”
It wasn’t the telly remote, was it…
Having 45 remote controls on the lounge table is like a modern technology “syndrome” that’s about as inconvenient as it gets.
Here’s the good news: You can control the TV and your AV receiver — and possibly more devices — using something called Consumer Electronic Control (CEC).
It turns out, you only need one remote on the table to control the lot!
Read on to find out how this works and how to control your Jensen home theatre system with no more than your TV remote.
- What Is CEC?
- How To Set Up CEC On Your System
- How To Set Up CEC: Cheat Sheet
What Is CEC?
HDMI cables have a ton of wires inside them. This means there are many different “conductors” available for different purposes. So, since HDMI cables started catching on in the industry, there are many useful features that have been adapted for home theatre systems.
CEC is one of the more simple and longest standing of these features.
CEC passes an electrical signal through the HDMI ARC (Audio Return Channel), separate from audio and video, that allows devices to work together.
The end result is you can use one remote to control certain functions of multiple devices.
What can you do with HDMI CEC?
The most common (and useful) features this helps with are power on and off, and volume up and down.
CEC triggers your AV receiver to turn on when you turn on the TV (or set the TV to the input that your receiver is connected to).
It also tethers the volume controls between the TV and receiver. So you’ll use the TV remote for the volume and it will adjust the actual output level of your receiver. This prevents annoying situations where you’re maxing your TV volume out at 100 and still can’t hear a thing.
CEC can also do things like automatically switch inputs when your TV detects a new signal at a particular one. This includes automatic power on for all devices connected through that input.
It used to be used for a lot of other features too, like setting timers on set top boxes and play/pause/rewind… but now that we have streaming and built in features these may not be necessary.
Power, volume and input switching are 99% of the features that get used, so as simple as it sounds it’s very worthwhile.
Next: a few things worth noting.
A few notes on CEC…
To prevent confusion, know that CEC is sometimes called simply “HDMI Control.” It depends on the brand of TV or AV receiver. When you go through the settings to turn it on you may want to keep that in mind.
Many TV brands also have their own name for CEC, which can be confusing. Here are a few examples:
- Anynet+ = CEC on Samsung TVs.
- Simplink = CEC on LG TVs.
- BRAVIA Sync = CEC on Sony TVs.
If your TV brand isn’t one of these and you’re struggling to find the CEC settings, start looking for a weird name that they might be using to describe it.
One last thing to note…
The age of your electronics may come into play with CEC. The technology has been used since the ‘70s so technically it’s in a lot of equipment. But that doesn’t mean every CEC-capable device will be compatible with the others.
I would expect any CEC-enabled devices from the last 10 years to play along — at least for power and volume. The exception might be very cheap or very fringe equipment from super small brands.
If you run into issues setting CEC up, this may be why.

How To Set Up CEC On Your System
Here are the general steps you’ll take to activate CEC on most any home theatre system:
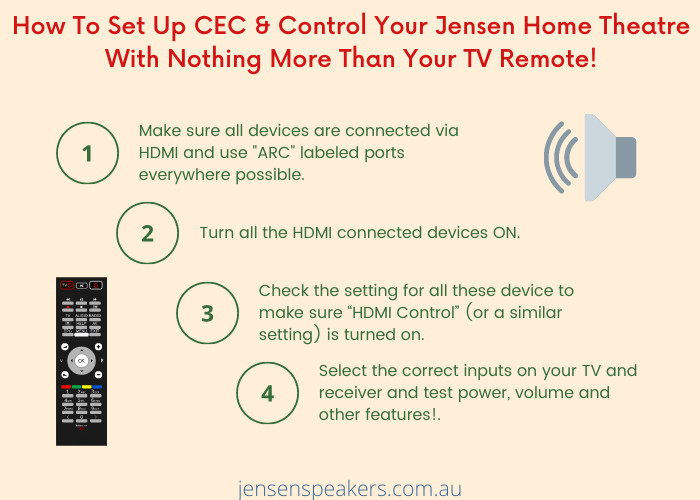
- Make sure all devices are connected via HDMI and use ARC labeled ports everywhere possible.
- Turn all the HDMI connected devices ON.
- Check the setting for all these device to make sure “HDMI Control” (or a similar setting) is turned on.
- Select the correct inputs on your TV and receiver and test the devices.
When testing, check that everything powers on, off or goes into standby correctly by using the power button on your TV remote. Check that the volume on the remote controls the receiver’s actual volume output level. Change the input on the TV to something random, then switch the AV receiver off and back on to see if auto input switching works.
That’s all there is to it. You should have a clear view of how to CEC to control your home theatre system with only your TV remote!
Here’s a brand-specific guide to activating CEC
Here at Jensen we offer our clients top-quality Denon AV Receivers for their home theatre systems. These are excellent device hubs to connect everything in one place. They offer features like extra music zones for the home, app control, and streaming services built-in. Best of all, they have plenty of power and sound amazing.
Here’s how you would activate CEC specifically on a Denon AV receiver to control it with your TV remote:
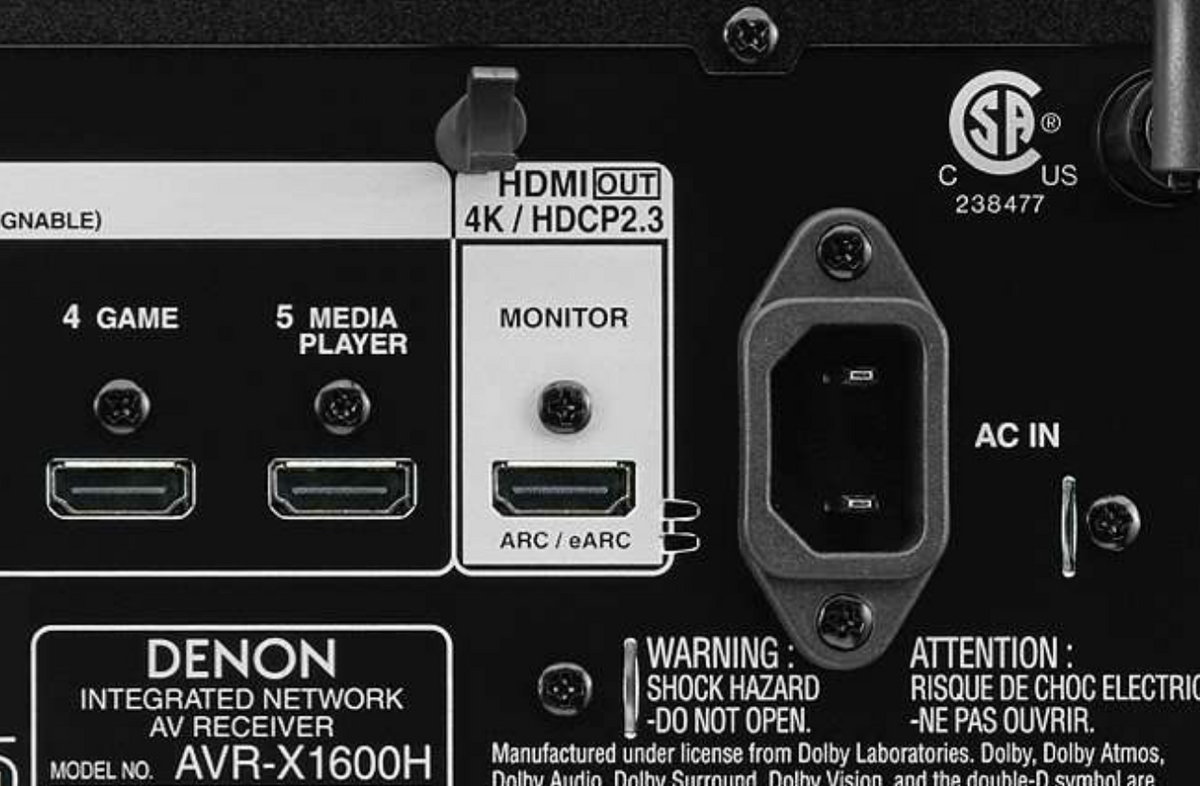
1. Connect the receiver to your TV by HDMI. Use the MONITOR HDMI port with ARC/eARC below it on the receiver. Use an HDMI input on the TV that has an ARC label as well. (eARC is the latest ARC technology that requires HDMI 2.1 cables. It’s also needed for Atmos.)
2. Turn on both the receiver and the TV.
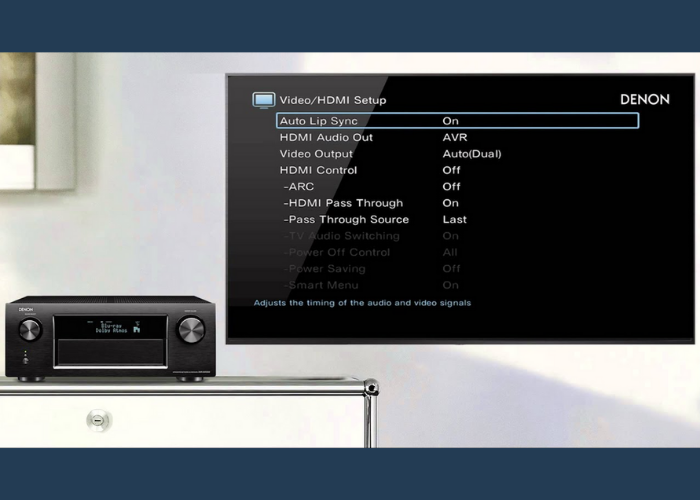
3. Use the receiver’s remote to go into the settings menu. Go to Settings >> Video >> HDMI Setup and turn on “HDMI control.”
4. Use the TV’s remote to go into the settings and turn on CEC there as well. (Look for HDMI, Audio, Advanced, or Expert settings.)
5. Optional: “Smart Menu” can also be switched on to allow the TV remote to access and control your Denon receiver’s on-screen settings menu.
That’s it!
The last thing you might want to do is change the auto-standby feature so it goes into standby faster. This is because your electronics will switch on automatically now and standby helps you save on power.
Go to Settings >> General >> ECO and change “Auto Standby” for the MAIN ZONE from Off to 15 minutes (or whatever you prefer).
Another Setting You Should Change…
While you’re digging into the settings on your TV and receiver, there’s one hugely important one to address.
In order to actually tap into the audio performance of your AV receiver, you need to make sure the TV digital audio output is set to “Bitstream.”
The alternative (and often default) is “PCM.” This causes the TV to process surround sound audio BEFORE it goes to the receiver… which is a tragedy to your audio experience. That’s because your AV receiver has high-powered digital processing that understands the newest Dolby and DTS formats.
Again, look for HDMI, Audio, Advanced, or Expert settings in your TV. You want to change the Digital Audio Output from PCM to Bitstream!

How To Set Up CEC: Cheat Sheet
Thanks for reading!
If you have any other questions, contact us here.
To learn more, check out these related articles…
What AV Receiver Should I Buy For Home Theatre?
Home Audio Guide To Bluetooth And Wifi
4 Reasons To Add Atmos To Your Home Theatre